Categories
computer engineering

How I Integrated Claude desktop with MCP Toolbox and BigQuery on Windows

Intro

Just days after Google Cloud rebranded the GenAI Toolbox for Databases to the MCP Toolbox for Databases, an exciting new capability appeared: support for BigQuery as a data source.

This is a big deal.

Why? Because it immediately unlocks three powerful advantages:

  1. BigQuery datasets are everywhere — from Google’s public datasets to private enterprise data, the ecosystem is rich and growing.
  2. The Model Context Protocol (MCP) has emerged as the go-to standard for connecting GenAI clients to real backend tools and data.
  3. By combining both, we can now connect GenAI clients that support MCP (like Claude) directly to BigQuery — and run live queries, interactively, in natural language.

Let’s walk through how to wire all this up — and get Claude querying BigQuery using the MCP toolbox.

After hours of trial and error, obscure errors, and a bit of CLI sorcery, I successfully configured Claude to work with the MCP Toolbox for querying BigQuery directly from Claude’s interface.

This post outlines the exact steps I followed, including key troubleshooting tips and configuration files. Hopefully, it saves you (or your future self) hours of confusion.The big issue was that i coudn’t find a proper example online for the scenario below:

  1. running MCP Toolbox locally
  2. connecting to BigQuery
  3. using MCP Toolbox from Claude Desktop (the exact config needed)

Tools Involved

  • Claude desktop app (Anthropic)
  • mcp-toolbox executable
  • BigQuery + service account credentials
  • Windows 10/11
  • PowerShell

Step 1: Setup Your BigQuery Credentials

First, create a service account in Google Cloud Console and download the JSON credentials file.

Then define it in the Claude configuration (see below) — this is what I ended up doing. Trying to setup a system environment variable or using the google cloud command line tools on my desktop, didn’t work for me, as Claude is not taking those in account when launching the MCP toolbox.


Step 2: Write Your tools.yaml File

In your mcp-toolbox directory (e.g. C:\projects\mcp-toolbox), create a tools.yaml file like this. Note that identation plays a crucial role and if you are not careful, errors will emerge.

sources: 
  my-bq-source:
    kind: bigquery
    project: evident-healer-380615

tools:
  search_release_notes_bq:
    kind: bigquery-sql
    source: my-bq-source
    statement: |
      SELECT
        product_name, description, published_at
      FROM
        `bigquery-public-data`.`google_cloud_release_notes`.`release_notes`
      WHERE
        DATE(published_at) >= DATE_SUB(CURRENT_DATE(), INTERVAL 7 DAY)
      GROUP BY product_name, description, published_at
      ORDER BY published_at DESC
    description: |
      Use this tool to get recent Google Cloud release notes.

toolsets:
  my_bq_toolset:
    - search_release_notes_bq

Step 3: Update claude_desktop_config.json

Claude uses this config to launch MCP servers. On Windows, this file is located at:

shellCopyEdit%AppData%\AnthropicClaude\claude_desktop_config.json

Here’s the working configuration I used:

{
  "mcpServers": {
    "bigquery-mcp-toolbox": {
      "command": "C:/projects/mcp-toolbox/toolbox.exe",
      "args": [
        "--tools-file", "C:/projects/mcp-toolbox/tools.yaml",
        "--stdio"
      ],
      "env": {
        "BIGQUERY_PROJECT": "your_project_id_here",
        "GOOGLE_APPLICATION_CREDENTIALS": "C:/projects/claude-bq/your_credentials_file_here.json"
      }
    }
  }
}

⚠️ Make sure to use forward slashes (/) even on Windows paths.


Step 4: Launch Claude and Use Your Tool

  1. Open Claude normally
  2. Go to the “Tools” tab or use the @tool keyword in chat.
  3. Try invoking your tool by asking something like: @search_release_notes_bq Show me new GCP features

Common Pitfalls (and Fixes)

  • Missing --stdio flag: Without it, Claude can’t talk to the tool.
  • Wrong credential path: Backslashes (\) or typos will cause silent failures.
  • Missing env block in claude_desktop_config.json: Your service account won’t be picked up unless GOOGLE_APPLICATION_CREDENTIALS is passed explicitly.
  • Wrong JSON syntax: Use a JSON linter to validate claude_desktop_config.json.

✅ Success!

Once everything clicked into place, Claude started launching the BigQuery MCP toolbox without errors, and I could run SQL queries against BigQuery data from within the Claude chat window.

Here is an example of the result of a prompt such as

“can you plot the monthly revenue of my ecommerce store using bigquery data”?


📌 Final Thoughts

MCP is powerful but still evolving. Documentation is sparse, especially for Windows setups — so if you’re going down this path, be ready to debug. Hopefully, this post gets you much closer to the finish line.

Feel free to reach out or comment if you hit snags!

Resources:

Categories
Barbeque

Πικάνια στη σούβλα

Είναι η πρώτη μου απόπειρα για πικάνια στη σούβλα, στην ψησταριά υγραερίου Vanward Majesty S. Οι προηγούμενες δοκιμές ήταν στις μαντεμένιες σχάρες και μετά την 1η – 2η απόπειρα τα ψησίματα ήταν τέλεια.

Όπως θα δείτε και στο παρακάτω βίντεο, το ψήσιμο στη σούβλα έχει την πλάκα του, έχει την ευκολία του (με την έννοια ότι δεν χρειάζονται γυρίσματα με το χέρι και έλεγχος μην το κάψεις εξωτερικά), αλλά από την άλλη έχει και τις δυσκολίες του.

Οι βασικές δυσκολίες ήταν ότι:

  • για να χωρέσω μια ολόκληρη πικάνια στη σούβλα, χρειάστηκε να τα στριμώξω λίγο τα κομμάτια παραπάνω από ότι ήθελα (την έκοψα χοντρές φέτες)
  • οι αναφλέξεις ακόμα και με κλειστό καπάκι ήταν πάρα πολλές λόγω του ότι το κομμάτι είναι αρκετά λιπαρό. Αναγκάστηκα να σβήσω κάποιες φορές τους καυστήρες και γενικά τους δούλευα στο ελάχιστο σε ένταση

Στους περισσότερους οδηγούς που είχα βρει στο ίντερνετ, έλεγε ψήσιμο μιας ώρας περίπου. Η αλήθεια είναι ότι αν την άφηνα μια ώρα, πιστεύω ότι θα είχε γίνει κάρβουνο. Στην Vanward Majesty S με τους 3 καυστήρες αναμμένους στην ελάχιστη ένταση και με μισή ώρα ψήσιμο, μου βγήκε (very) well done.

H διαδικασία είναι πολύ απλή, έκοψα την πικάνια σε χοντρές φέτες και την πασπάλισα με χοντρό αλάτι με άρωμα λεμόνι. Οτιδήποτε άλλο, όπως πχ μαρινάρισμα, στην πικάνια θεωρώ ότι είναι αμαρτία, γιατί το κομμάτι αυτό έχει από μόνο του πολύ καλή και ιδιαίτερη γεύση.

Pros
  • πεντανόστιμη
  • γρήγορη
Cons
  • σχετικά ακριβό κομμάτι
  • πολύ λιπαρό
  • θέλει προσοχή μην το κάψεις
Categories
Analytics

Data Studio: How to apply the same filter across multiple data sources

One issue that you may have met in Data Studio, when working in reports with multiple data sources is filtering of similar data. You may have the same column (eg. country) in both data sources with the same contents, but creating and applying a filter for one of them, does not filter the others. So you have to reside to non optimal solutions such as using a second filter control for other components of the report.

The reason that this is not optimal should be obvious: imagine an example with 2 tables sourcing data from different systems (eg Google Analytics and internal CRM) where you want to filter users by country. You would have to create 2 filter controls in your report and anytime you needed to switch countries you would have to select the appropriate country in one after the other.

Luckily, there is a workaround for this, based on custom fields. When you create a custom field in a data source, you will notice that Google provides you with an ID for that field.

custom field ID in Google Data Studio

Unfortunately this is not the case with default (non custom fields). If your data sources are “default” (meaning as the relevant source provides them), in order for the following workaround to help, you need to enrich them with a custom field (on each data source). You may perfectly well just replicate the column you want “as is”. You will have 2 fields with the same values in each of your data sources, but I guess you can live with that. The gains from not having to work with multiple silly filters in your report, will compensate you. A simple way to achieve that for example if we are talking about a text field, is to use this formula for the custom field that copies it:
CONCAT(source dimension,”). (eg CONCAT(country,”). Then copy the field ID that Google gave to your new custom field.

Next step is to go to your other data source and do the same. Just be careful, the first time you create the dimension on the second data source, you will have your only chance to use the same field ID. Google will auto provide you with a different field ID, but the first time you are creating it, the actual field ID is editable!

field ID on a new calculated field is editable on create

Use this chance an past into the field ID the field ID you copied from the previous data source. You are set! From now on, any filter control that you will enter on the report that uses an of those calculated fields, will control and filter data across your data sources!

PS: It goes without saying, that the actual data in the columns need to match as well, at least for some of the records, for this workaround to be meaningful. Eg if you create 2 custom country fields and you try to filter by country = Greece, while the second datasource does not have Greece as a value in the custom field, then it will not make sense to have it.

Categories
Barbeque

Κοτόπουλο στη σούβλα στην ψησταριά Υγραερίου

Στο σημερινό post θα σας δείξω πώς έφτιαξα Κοτόπουλο στην σούβλα στην ψησταριά Υγραερίου Vanward Majesty S.

H σούβλα είναι έξτρα εξάρτημα που πωλείται ξεχωριστά, αλλά υπάρχει έκδοση προσαρμοσμένη για την εν λόγω ψησταριά. Η ίδια η ψησταριά έχει τις υποδοχές για την αναμονή της σούβλας.

Η όλη διαδικασία ήταν πολύ εύκολη:

  • χρησιμοποίησα ένα μέτριο κοτόπουλο ~ 1.5 kg (την επόμενη φορά θα βάλω 2 κοτόπουλα , αφού χωράνε εύκολα, αλλά όχι μεγαλύτερα σε μέγεθος γιατί θα βρίσκουν στο καπάκι της ψησταριάς)
  • το μαρίναρα με βούτυρο και Maggi νοστιμιά
  • εκτός από τα στηρίγματα που έχει η σούβλα, το έδεσα και με ένα σύρμα για επιπλέον ασφάλεια, για να μην γυρίζει / πέσει, αλλά και για να του μαζέψω λίγο τα πόδια / φτερά για να μην βρίσκουν στο καπάκι της ψησταριάς
  • το έψησα για 1 ώρα περίπου με κλειστό το καπάκι της ψησταριάς (εκτός από την ώρα που τραβούσα τα video 😀 )
  • οι καυστήρες ήταν στην αρχή και στο τέλος του ψησίματος και οι 3 στην μέγιστη ένταση
  • κατά την διάρκεια του ψησίματος ο μεσαίος καυστήρας ήταν στην ελάχιστη ένταση για να απόφύγουμε το κάψιμο της πέτσας και τις αναφλέξεις (τα καμμένα κομμάτια που φαίνονται στη φωτό είναι από τα επιπλέον υλικά με τα οποία άλοιφα το κοτόπουλο κατα την διάρκεια του ψησίματος (κυρίως η μαρινάδα από την Maggi νοστιμιά τα οποία με ένα απλό σκούπισμα έφυγαν – αλλά δεν σκέφτηκα να βγάλω καλύτερη φωτό)

Για την επόμενη φορά θα έκανα διαφορετικά:

  • θα έβαζα σίγουρα 2 κοτόπουλα γιατί αυτό εξαφανίστηκε πριν βγει από τη σουβλα
  • θα φρόντιζα η μαρινάδα να μην έχει στερεά κομμάτια μέσα για να μην μαυρίζουν / καίγονται

Categories
Barbeque

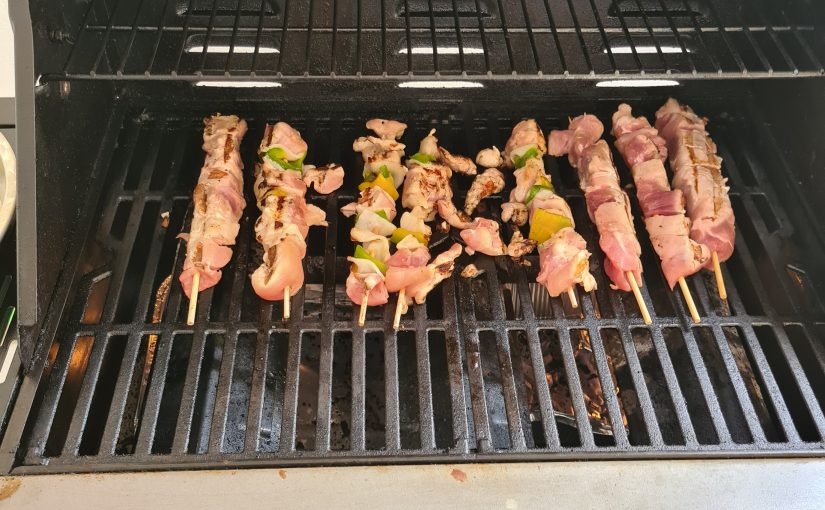
Pork and Chicken Skewers on Gas Barbeque

Last week we made some skewers on our Gas Barbeque. Skewers are very fast to cook although there are some tricks involved for perfect success.

  • We got a mix of chicken and pork meat. Chicken and Pork needs to be cooked well done, it is not like Beef that you can taste almost raw
  • The good thing is that since the slices on the skewer are thin, this wont take a lot of time
  • I grilled them for about 15 minutes with the lid closed for most of the time
  • I preheated the BBQ at 250 degrees Celcius with the gas turned to max and then lowered all switches to the lowest level to put the meat on the grates
  • I had to cook them at indirect heat at some points, because the juices from the meat caused a lot of flames in the BBQ and I did not want to burn them. So what I did was turn of 1/3 gas tubes and cook the skewers above the tube that was turned of with the heat of the other 2 ones
  • Lessons learned: next time I will use metal skewers
  • I will also to get a special grate for skewers because the way I put them directly on the cast iron grates, made it difficult to handle as lots of meat slices fell apart
Categories
Barbeque

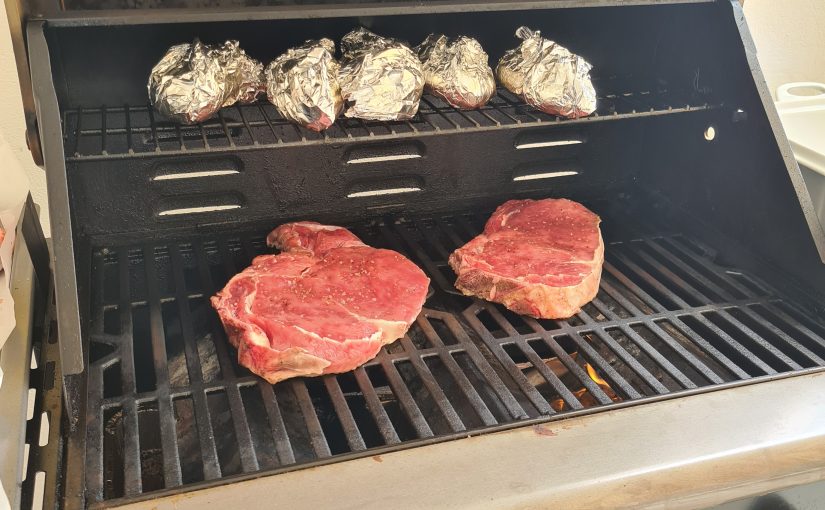
Beef Steak on Gas Barbeque

  1. Bought some Steakes of about 2 cm thick.
  2. Marinated the Stakes only with lemonated thick salt and pepper
  3. Pre-heated the BBQ to about 250 degrees Ceclcius sto that the grates are super hot
  4. Also baked some Potatoes. I just covered them with foil and put them on the top grill. They need more time than the meat, so I put them beforehand. They are ready when you can fork them with ease.
  5. Cooked them for 10 mins (5 each side). There are recipes saying you need 2 min per cm of thickness but I wanted to also feed the kids with them and they prefer them very well done

My gas barbeque is a value for money Vanward Majesty S.